How to Shave a License Plate

Here we have a beautiful brand new Dodge Ram pickup truck. Unfortunately human error has caused the bumper some discomfort. Due to some sort of confusion the holes for the license plate were incorrectly drilled. I have a hard time understanding how it happened personally, especially since there is a pair of divots indicating the spot. Anyhow what’s done is done, lets see the repair. This same method could be used to shave license plate holes also.

Here are the two holes, you can see the two big holes that were drilled, the other little spots are the divots to indicate where the proper spot is. My first step is to remove the bumper from the truck. It is done by removing 4 10mm bolts at the bottom, 1 10 mm from each side going in from the fender, a few 8 mm attaching at the wheel liner & a few tabs under the grille. (grille needed to be removed to). Once the bumper is removed I then removed the center insert and the bottom splash shield so I have only the one painted part of the bumper.

I start from the inside by grinding out the holes. They need to be tapered as gradually as possible. I am using a mini grinder with some 36 grit paper.
Next I will rough up the surrounding area with some 80 grit paper for the epoxy to adhere to. Here is what it looks like prior to applying my structural adhesive:
Having anything adhere to plastic greatly depends on the plastic being clean. I will first use an alcohol based plastic cleaner:
Then I will apply a plastic adhesion promoter and allow it to flash off for 15 minutes.
My next step is to apply some mesh over the repair area to help the adhesive bind together creating a stronger repair.
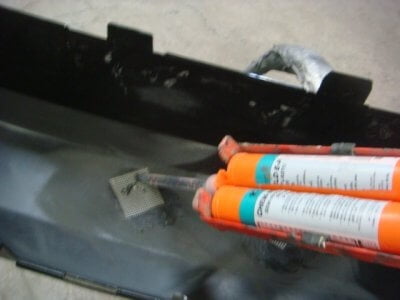
Here I am using a Kent epoxy based adhesive. I am going to use a mixing tube to eliminate manual mixing. You should always purge your tube first by squeezing out the product and discard about a tubes length as shown below: (that picture is actually my second purge).
The epoxy is applied directly to the repair area with enough dispensed to cover the tape and grinded area.
Next it is spread with a slick to cover the repair.
That’s it for the back, now we can move to the front.
I’ll start the front by grinding the holes out similarly to the backside. I am trying to keep it smaller on the front side but it did end up getting bigger then I’d liked it to.
Next I’ll sand just as before with some 80 grit followed by a plastic wash & adhesion promoter. I’ll also apply it the same way from the tube directly to the surface.
My next step is to block sand it straight. I’ll start off with some 80 grit and gradually up grit to try and finish in 180 before priming.
If it turns out perfect after the epoxy skim you can backsand and prime right from there. In this case I wanted a little bit more perfection before priming so I applied a flexible polyester putty and block sanded it finishing in 180 the same way. Remember you can only apply polyester putty over epoxy based bumper repair adhesives, not urethanes….the repair will fail if you attempt!
So I’ve now backsanded with 320 grit paper a few inches beyond my 180 scratches then cleaned off before applying my primer. This is a Glasurit low voc, urethane primer.
I will block sand my primer with some 320 then upgrit to finish in 500. My next step is to prepare the rest of the bumper for blending. It will only get cleared. I used RM 851 sanding paste with a grey scotch pad and really scrubbed it good. It took about 5-7 minutes to paste.
It’s then off to the booth for a paint job. It will get three coats of base and two coats of clear, a quick bake and it’s ready to re-install.
Once it’s back on the truck it looks something like this:
It was a pretty simple repair but a lot more steps then most customers understand. It took about 4 hours to repair. I could have saved a bit of time by applying my adhesives to the front and back at the same time but hey…I didn’t want to hurt myself. The bumper looks like OEM and now has a better warranty then Chrysler would have offered anyhow. (that would be lifetime btw).